Montessori the DIY way!
This simple, easy DIY Sensorial variation will be a great way to introduce Montessori to your child or children!
This post may contain affiliate links. I may earn compensation when you click on the links; at no additional cost to you. Please see the disclosure policy for more information.
Introducing your child to Montessori practices, principles and ideas does not have to break the bank. There are many alternatives and ways to add Montessori to your home or home school, without purchasing all of the more expensive materials. Don’t get me wrong, there are some must have Montessori materials that you should invest in if you want to use the Montessori philosophy. However, you do not need to purchase and entire classroom of materials in order to do so.
So I decided to come up with a way to help those wanting to incorporate Montessori materials and work into their home environment! I will give you step by step instructions on how to make easy, simple DIY Montessori materials, that require a few inexpensive household items! It’s a win win situation for all!
The Montessori Work-The Sensorial Area in a Montessori environment
The materials and work in the Sensorial area of the Montessori environment enables children to use their senses to discover and explore. They use a variety of materials that they can manipulate and use to learn different objectives. The Sensorial Area introduces concepts that focus on all five of the child’s senses. The purpose of the work in the Sensorial Area is to assist and prepare children to be logical, perceptive, and aware of their environment and world around them. It teaches concepts such as discrimination & order; visual discrimination in differences of dimension, width, length, size and color.
Size discrimination-The Red Rods, a Montessori Material
The Red Rods are a common sight in a traditional Montessori classroom environment. The materials themselves are a set of 10 red rods of the same thickness, and are usually made of wood. The rods vary sequentially in length by 10 cm. They range in length from 10 cm. to 1 meter.
The Objectives & Purposes:
Here are a few of the objectives & purposes of using this work. Children will have the opportunity to:
- exercise observation and judgement
- exercise and refine visual discrimination of length
- exercise eye-hand coordination
The original Montessori Red Rods are very large materials and may not be ideal for use in a home or home school setting. Since the longest red rod measures to over 3 feet in length, it may not be ideal for use in all settings. You may not have the space required to store this large of a material. No worries, I’ve got you covered with this DIY Red Rods alternative!
DIY Red Rods alternative material
This DIY alternative is ideal when you do not have the storage space capabilities for the traditional Red Rods. This is a simple, easy alternative, that still presents itself to the objectives of the larger, traditional materials.
Supplies needed:
1. a pair of of kitchen scissors
2. a pack of bamboo skewers (you can get these from Dollar Tree)
3. a black sharpie
4. a sanding block (you can get this from the Dollar Tree as well!)
5. a ruler (yep, you guessed it…Dollar Tree)
Step One:
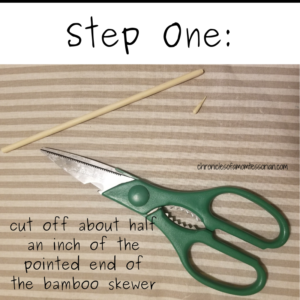
The first step in making your Red Rods alternative material is to take one of your bamboo skewers and cut about a half of an inch off of the pointed end. It is best to cut from the pointed side so that it is not a hazard for children to use. This first skewer will be the guide for the other skewers in the set.
Step Two:
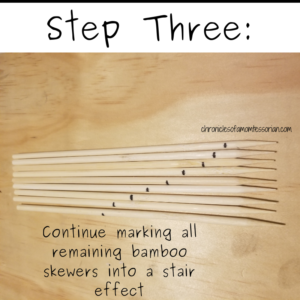
Take your freshly cut bamboo skewer, and place it next to the ruler. Here is where you will decide where to begin cutting the remaining bamboo skewers for the work. Try to make your cuts the same length apart on each remaining skewer. That way, it is uniform and consistent. Make the cuts apart enough from one another to make it noticeable, but not too much to where you end up with too small of an ending piece. You don’t want the smallest piece of your completed material to be a choking hazard.
Step Three:
Go through and carefully measure and mark all of the remaining bamboo skewers. Try to make a stair effect with the marks you make on the skewers.
Step Four:
Begin cutting the bamboo skewers. I found that it was best and easiest to use a pair of kitchen shears with the shell cracker. You are going to need a good, set of scissors to make an indention and cut through the bamboo skewers. They are pretty thick.
Step Five:
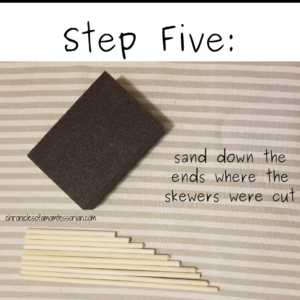
Since you cut off the pointed end of the bamboo skewers, the wood will be rough and can cause a hazard for children’s use. Use your sanding block to sand down any rough parts on the ends of the bamboo skewers. Make sure to sand down any and all rough parts of the skewers.
Step Six:
Find a nice tray for the work to go on to. I had this nice gold tray hanging around from my days in the classroom, so I thought it would be a great way to finish off the work. You now have a mini variation to The Red Rods Montessori materials.
OPTIONAL: You can choose to paint your size discrimination work. I decided that I liked the natural look of mine, so I an opting to not paint them.
Introducing the mini variation of The Red Rods Montessori materials
When introducing your child to this work and any Montessori work, it is important to remember that a formal lesson on how to appropriately use the work is necessary. You must demonstrate, in detain, the proper way to use the materials. Be extra cautious of the words you use in all lessons; the language and word selection is a big part of Montessori lessons. Also be sure to state all expectations for the use of the materials. Always take into consideration the age, skill set level and interest of each individual child.
Interested in the step by step lesson presentation for the mini variation of The Red Rods?
You can download the step by step presentation that accompanies this work. It comes with all of the purposes of the work, the points of interest (key points the child will receive from practicing this work), and the step by step instructions on how to give this lesson; with key words & phrases that are important to the lesson! Want it now! The mini variation write up is yours below!
Be on the look out for more DIY Montessori materials! There will also be complete sets of Montessori works and materials available for purchase as well. More details coming soon!
Happy DIY-ing!









Brilliant! I’ve added the supplies for this Montessori size discrimination idea to my shopping list! (Yup – if I don’t stay focused in Dollar Tree, I’m in trouble.) I admire the Montessori method very much and am helping our daughter-in-love with her children. I have time to do the prep work! 🙂 Thank you!
I haven’t try this to my kids yet! Good to know!
This looks like a great DIY for people with kids! Or people who take care of kids. 🙂
This is such a great activity. My cousin loves this type of stuff so I’ll have to show her these